

Saddle height is the adjustment that has the biggest effect on your position on the bike. A few millimetres can make the difference between smooth pedalling and pain in your knees, back or pelvis.
Have you just bought a bike, changed your saddle or shoes, or started to feel discomfort when pedalling? This guide brings together everything you need to know: why this adjustment matters, the methods for finding it, the key figures, the common mistakes and a complete step-by-step guide.
In short
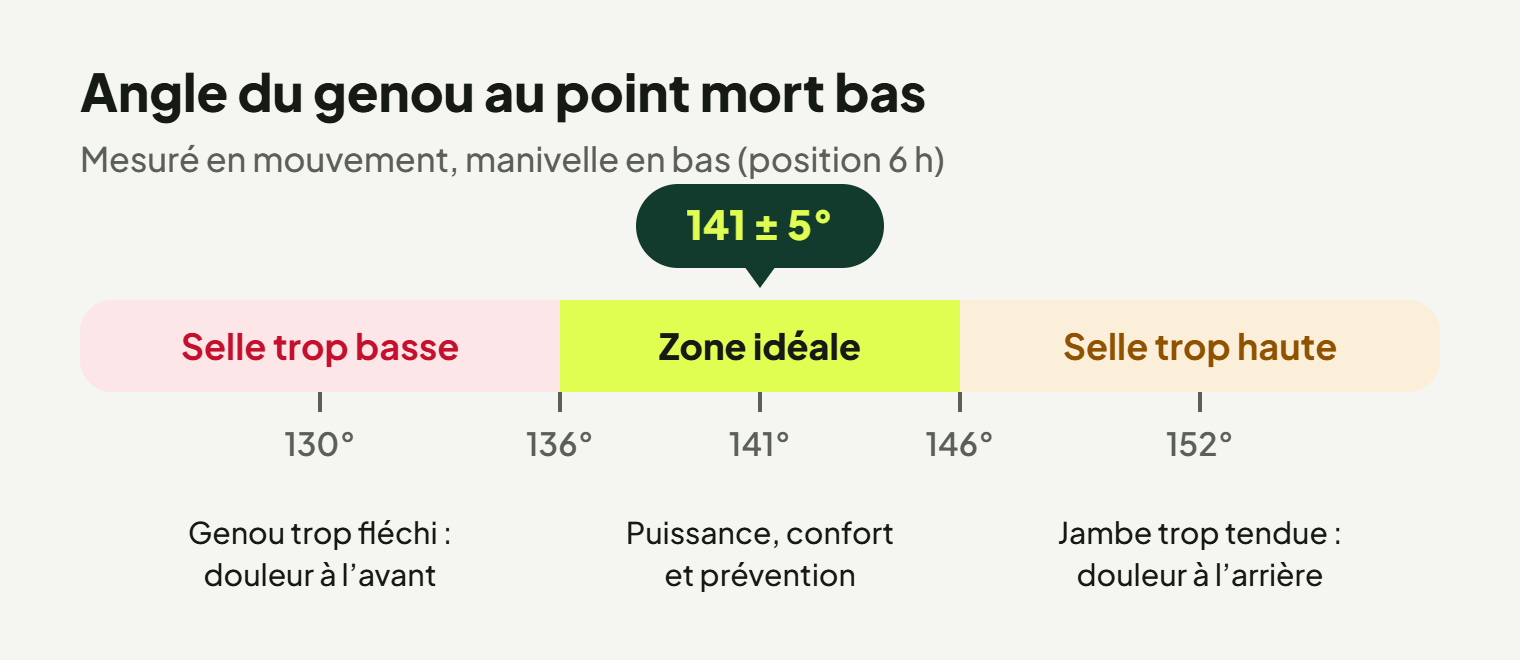
- The most reliable benchmark: the maximum knee angle, measured while pedalling. Ideal range: 141 ± 5°.
- The inseam × 0.883 formula gives a starting point, not a final setting.
- Correct in small steps of a few millimetres, then allow 2 to 3 weeks to adapt.
- Check again after every change of saddle, shoes, pedals or cleats.
Contents
Why saddle height matters so much
Pedalling means bending and straightening your knee, hip and ankle thousands of times per ride. Saddle height sets the range of this movement: the higher the saddle, the more the leg extends at the bottom of the pedal stroke; the lower it is, the more the knee stays bent.
- Comfort : a saddle that is too high makes the pelvis rock with every revolution (chafing, groin discomfort, lower back); too low and it overloads the thighs and kneecap.
- Prevention : the knee is one of the most frequently painful areas in cyclists, amateur and professional alike (Clarsen et al., 2010, American Journal of Sports Medicine), and saddle height is one of the first adjustments to check.
- Efficiency : your muscles work within a favourable range, so you use less energy at the same speed.
The three methods
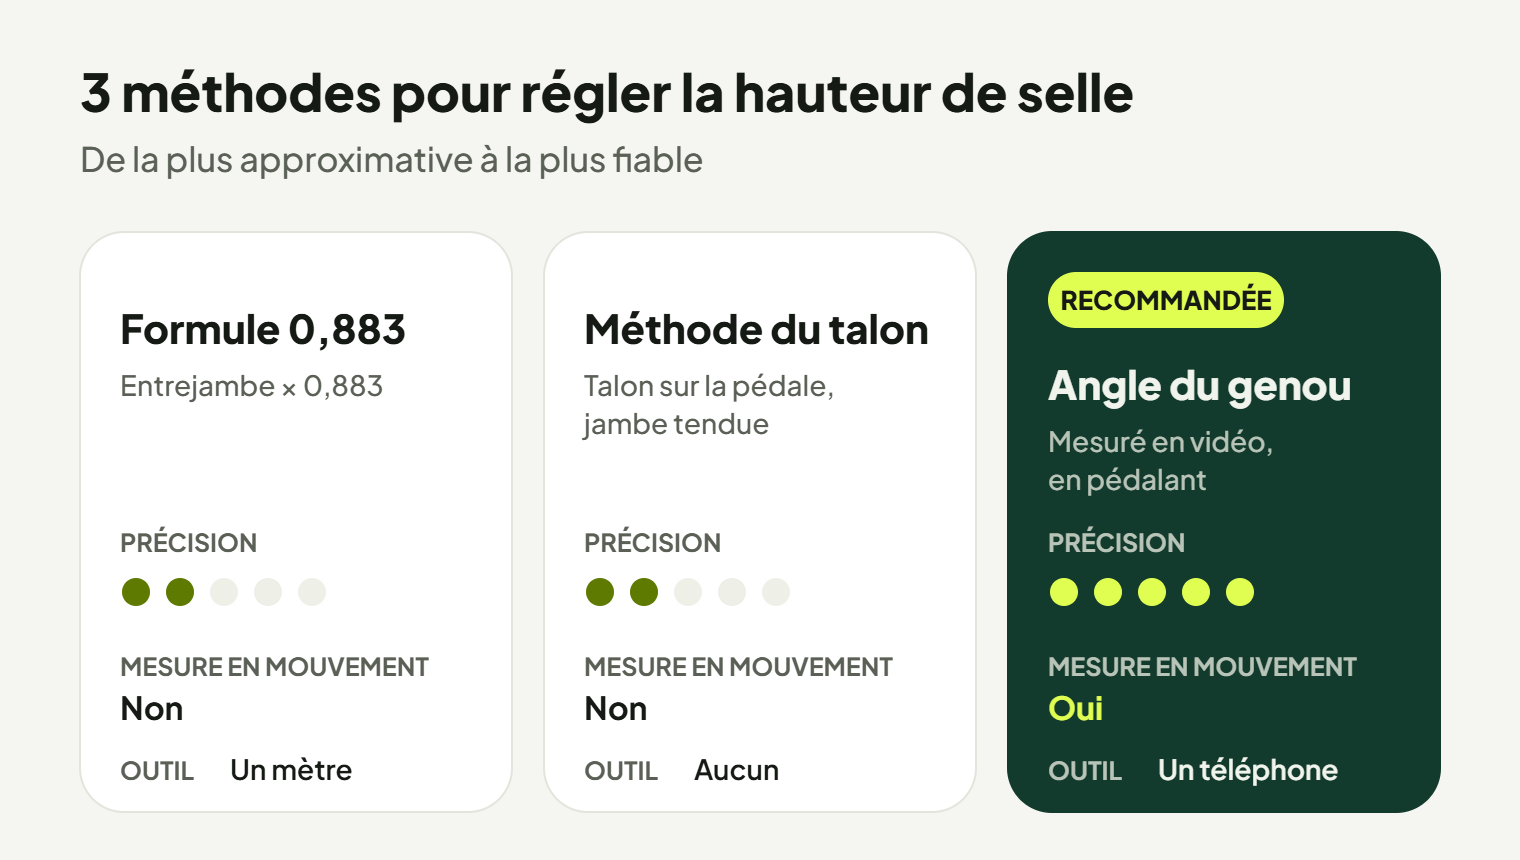
Method 1: the 0.883 formula
This is the best known, popularised by Greg LeMond based on the work of coach Cyrille Guimard.
The formula
Saddle height = inseam × 0.883, measured from the centre of the bottom bracket axle to the low point of the saddle. Example: for an 83 cm inseam, 83 × 0.883 = 73.3 cm.
To measure your inseam: barefoot, back against a wall, feet about fifteen centimetres apart. Slide a book up firmly into your crotch and measure from the floor to the top of the book.
- Advantage : quick, gives a reasonable starting point.
- Limitation : ignores crank length, sole thickness, cleat stack height, saddle shape and your flexibility.
Method 2: the heel method
Sitting on the bike, held against a wall, put your heel on the pedal at the bottom of the stroke. Your leg should be straight without your pelvis tilting.
- Does your pelvis tilt to reach the pedal? The saddle is too high.
- Does your knee stay bent? The saddle is too low.
- Advantage : no tools needed.
- Limitation : subjective and static. When pedalling, you push through the front of the foot, not the heel.
Method 3: the knee angle in motion
This is the reference method in posture analysis. The hip-knee-ankle angle is measured when the leg is at its most extended, at the bottom of the pedal stroke. Because it measures the end result, all the variables are taken into account: cranks, soles, cleats, saddle, flexibility, pelvis position.
Research also shows that a static setting does not guarantee the right knee flexion once you are moving (Ferrer-Roca et al., 2012, Journal of Strength and Conditioning Research). Hence the value of measuring while pedalling, which is what Posturise does from a simple video. This method is detailed in Saddle height: the knee angle method.
Knee angle benchmarks
| Maximum knee angle | Reading | Possible consequences |
|---|---|---|
| Less than 130° | Saddle far too low | Pain at the front of the knee, thighs tiring quickly |
| 130 to 135° | Saddle too low | Pressure on the kneecap, especially on long rides |
| 136 to 146° | Ideal range (141 ± 5°) | Best balance between comfort, efficiency and prevention |
| 147 to 150° | Saddle too high | Discomfort at the back of the knee, rocking pelvis |
| More than 150° | Saddle far too high | Hamstring tension, unstable pelvis, groin discomfort |
These values apply while pedalling, not with the leg resting while stationary.
Signs of a poorly set saddle
| Saddle too low | Saddle too high |
|---|---|
| Pain at the front of the knee, around the kneecap | Pain at the back of the knee |
| Thighs burning before you run out of breath | Pelvis rocking from side to side |
| Feeling of pushing without being able to extend your leg | Feeling of “reaching” for the pedal at the bottom |
| Knees coming up high, close to the chest | Toes pointing sharply down at the bottom |
The quick test at home
Film yourself side-on on a home trainer and watch it in slow motion. Is your pelvis rocking? Your saddle is probably too high. Does your knee stay clearly bent at the bottom? Your saddle is probably too low. For a measurement in figures, send the same video to Posturise.
The most common mistakes
Setting it once and for all
The right height changes as soon as your equipment changes. Check again after changing shoes, insoles, saddle, pedals or cleats, and when your flexibility changes.
Relying only on how it feels
After years with a poorly set saddle, the body gets used to it, and the right position may feel strange at first. Adjust according to the measurement, ride for 2 to 3 weeks, then reassess.
Copying another cyclist’s position
With the same height, thigh and shin lengths, flexibility and the way you place your foot differ. Copying a friend’s saddle height, even an experienced one, is a common mistake.
Forgetting that the settings are linked
Saddle height, setback and tilt are linked. Moving the saddle back takes it further from the pedal: you often need to lower it slightly to keep the same knee angle. Moving the saddle forward has the opposite effect.
Depending on how you ride
The 141 ± 5° benchmark applies to every type of riding. What changes is where you sit within the range:
- Road : supple pedalling and a high cadence suit the middle or top of the range.
- Mountain bike : riders often sit at the bottom of the range to keep mobility; a dropper post lets you lower the saddle on descents.
- City and touring : frequent stops and an upright position encourage people to lower the saddle. Don’t go below the range: get off the saddle when you stop instead.
- E-bike : same benchmarks, the assistance does not change the movement of the knee. See E-bikes: why your position still matters.
Beyond height
- Saddle setback : too far forward and it overloads the kneecap; too far back and it tires the back of the thighs. Starting benchmark: cranks horizontal, front of the knee roughly above the pedal axle.
- Tilt : saddle level or very slightly nose-down. Nose up means pressure on the groin; nose down means you slide forward and load your hands. See Uncomfortable saddle: adjust before you replace it.
Setting your saddle step by step

- Starting point : measure your inseam and set the saddle to inseam × 0.883.
- Set-up : home trainer, or bike against a wall. Pedal for 2 to 3 minutes to find your natural seated position.
- Video : side-on, whole body in the frame, 5 to 10 pedal revolutions at normal cadence. Detailed instructions: Filming a good posture analysis video.
- Analysis : send the video to Posturise. The AI measures your knee angle and tells you which way to adjust the saddle.
- Correction : mark the seatpost, move it a few millimetres, tighten to the specified torque.
- Adapting : ride for 2 to 3 weeks, then do another analysis and compare your sessions.
Want to give this fit to a cyclist? Discover the Posturise gift card.
Frequently asked questions
What is the best method for setting saddle height?
Measuring the knee angle while pedalling, ideally with video analysis. The ideal range is around 141 ± 5°. The 0.883 formula and the heel method are good starting points but lack precision.
How do I know if my saddle is too high or too low?
Saddle too high: rocking pelvis, discomfort at the back of the knee. Saddle too low: pain at the front of the knee, thighs burning quickly. Measuring the knee angle settles it.
How much should I move the saddle each time?
A few millimetres. Large corrections are made in several steps, with a new measurement between each.
How long does it take to adapt to a new height?
Allow 2 to 3 weeks of regular riding. Slight discomfort at first is normal; pain that persists is not.
Does the Posturise analysis work on a home trainer?
Yes, it is actually the recommended set-up. Failing that, you can pedal leaning against a wall.